If you've just bought a shiny new smartphone or tablet, you'll probably want to start playing with it right away. But first of all, you need to configure it. In this beginners' article, we'll explain step-by-step how to set up your new smartphone.
Each Android device is different, and each manufacturer gives its own devices little extras that make it stand out from the crowd of competitors. But deep down, Android devices are ultimately similar. Below is how the procedure looks with stock Android (on a Nexus 6).
Also Read:
1. Select a language
Once you've switched on the phone on, you’ll arrive at a welcome screen where you will be prompted to choose a language. A tap on the default language opens a list of all those available on the system. Select your preferred language from the list and tap the arrow to continue.

Android's friendly first screen. / © EnTech
2. Insert the SIM card and enter your PIN
Next, you will be asked to insert a SIM card. Putting your SIM card in your phone can sometimes be tricky – Sony devices usually have flaps that you need to open, while Nexus phones require a pin to open the slot. Sometimes the SIM needs to go under the battery, in which case you will need to carefully open the device rear.
You will then be asked to enter your PIN number, which usually comes in the SIM package.
3. Select a Wi-Fi network
If you find yourself within range of a wireless network, you can now connect to it. Simply select your network from the list and enter the password if required. Then tap "Connect".

Log into your Wi-Fi and wait for the device to connect. / © EnTech
4. Got another device?
At this point, you will be asked if you wish to copy your data from another Android device. If you can do this, and wish to, then do so. Otherwise, hit “No thanks”.
The easiest way to do this is with Google’s Tap & Go feature. This works by placing the two devices from which the transfer will take place together.

If you have another Android device you wish to transfer content from, the process is simple. / © EnTech
5. Set up/login to Google account (optional)
If you skipped the step above, the next stage is to set up or log into an account in order to use your smartphone with Google's apps and services, such as Gmail or the Play Store.
If you already have a Google account, you can enter those details now. Then you will be asked to accept Google’s terms of service and privacy policy. Read them (if you want) by tapping the highlighted phrases then hit “Accept”.
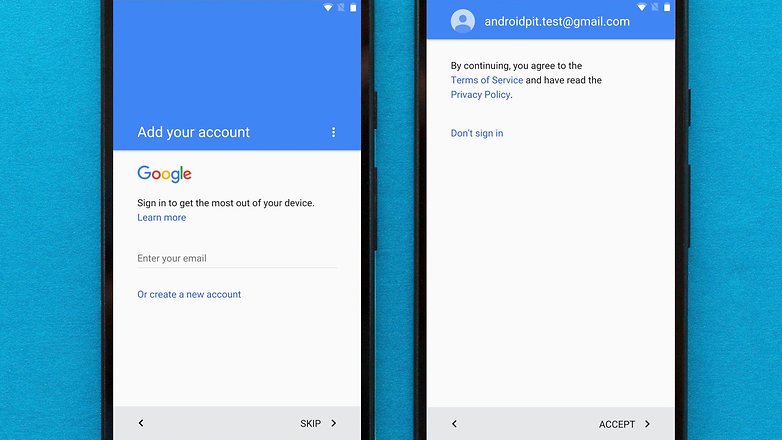
You can opt to make a Gmail account later, log in with an existing account, or create one. / © EnTech
If you don't already have a Google account, but would like to set one up, just follow the steps to choose a username and create a password. You don't need to have a Google account to use the phone, but you will need one in order to use all of its functions, including installing apps from the Play Store.
Some manufacturers, such as Samsung, ask you during the registration whether you want to create an extra account. This is only necessary if you want to use some special services from that company. You can simply skip this step if you want to.

You can opt-out of Google's data collection, if you wish. / © EnTech
Google will also ask which services you would like to opt-into. This includes backing up your device, which is recommended in case anything should happen to your device. The others you can assess on a case-by-case basis. None of them are essential and they can be switched on or off at any time.
6. Add another email and protect your phone
If you have an existing email address which you wish to sync with your Android phone, this is where you can add it. As with almost all of the steps in this list, this can be done at a later date.

Add further email accounts and secure your phone. / © EnTech
Next, you will be asked if you want to set up a security code on your device: we strongly recommend this. Should you lose your device, this security measure is a key step in preventing unwanted access to your device.
You will also be asked whether you want a PIN for when you start your device, which we recommend for the same reasons. Finally in this section, select your desired PIN.
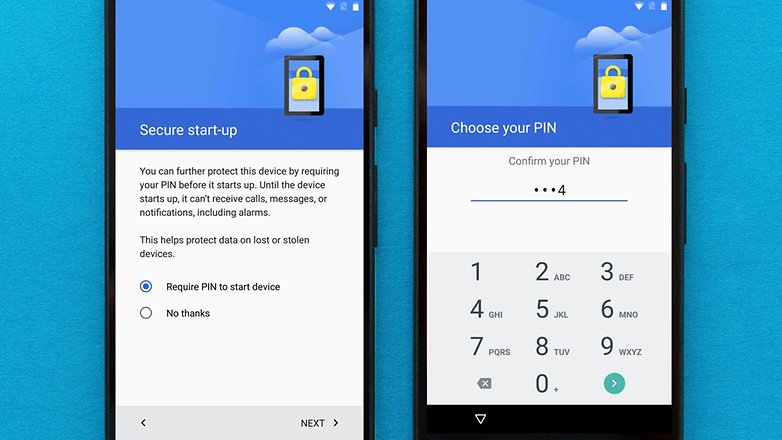
EnTech strongly recommends setting up a PIN. / © EnTech
7. Notifications
In this section, you set up how your device displays content when your phone is locked. You have three options:
"Show all notification content" means that, when you device is locked, if you receive a message, for example, this message will be displayed on your lock screen.
"Hide sensitive notification content" will show some notification information, like that you have received a message, but will hide the content of the message.
"Don’t show notifications at all" means you won’t see any notifications on your lock screen at all, but these will still be found in your device's notification shade.
We’ve applied this to message notifications purely because it’s easiest to visualize but this actually applies to all notifications you receive, no matter what app it is.

Configure how you want notifications to appear on your lock screen. / © EnTech
Following this, if you didn't already transfer files and data from a previous device, you now have a chance to restore files from a cloud backup. Select the backup you want, or skip this process.
8. Get Google Now
"Get Google Now" is the last setup screen you see on Nexus devices, but it's just a reminder of the benefits of using Google's clever assistant. Hit "Next" once you've read the information.

Hit next at the Get Google Now screen and you're all set. / © EnTech
9. Other services
Many smartphones come with pre-installed software, such as cloud storage services like Dropbox, Box or Google Drive. If you already have an account for these services you may be asked to log into them now, or you can register for the ones you want.
10. Insert your microSD card
If your phone has a microSD card slot, the last thing to do is to insert a microSD card, if you have one spare. This will provide extra storage space in your handset to allow you to save more files. If you don't have a mircoSD card, consider buying one to save space on your phone's internal storage.

If your device supports microSD cards, and you have one going spare, insert it. / © EnTech
11. Download apps from the Google Play Store (optional)
The initial setup of the smartphone is now complete. For an overview of the apps that have already been installed on your device, have a look at the app drawer. The app drawer is a list of icons for all the apps on your phone and the chances are that you'll find this at the bottom of the home screen (the screen you should currently be on). It's a gray circle with six dots inside.
Tap it and look around your app drawer. If there are any apps you don't have that you want, you can go to Google's Play Store to download them – the Play Store itself will be installed on your phone already. Installing apps is a simple process and the handset will walk you through anything you need to do (like signing in).
If you don't find an app drawer, it means your phone doesn't have one. To find your apps in this case, you simply swipe your finger left or right to see your other home screens, where your apps will be contained.

The Google Play Store is the place to get all your Android apps. / © EnTech
12. Install software and Android updates
When your Android is turned on for the first time, it might not be running the latest version of the software available for your specific model. For example, your phone could come with Android Lollipop or perhaps Android Marshmallow. It depends on the phone.
To check to see if an update is available, simply go into the settings of your phone. This is found as an app in the app drawer or by going through the notification shade and tapping on the settings icon (usually a cogwheel or a set of tools of some sort).

When you get a new phone, you usually have to install a system updated straight away. / © EnTech
Find the About Phone tab, which is usually located at the bottom of the settings menu, and tap it. It will look different depending on your manufacturer, however you will likely tap on something along the lines of Check for software updates.
Make sure that when you do this, you are connected to a Wi-Fi connection and that your battery is at least 50 percent full. The reason why you should update is that it (usually) provides more functions, better battery life and better security.
13. Personalize your phone
If you don't like the background image that came with your device, do not despair – every smartphone offers a selection of different backgrounds from which you can choose. The way to do this changes depending on the manufacturer, but look for Display or Wallpaper in the settings menu.
Quite often, if you press on the home screen anywhere for a couple of seconds, a window will appear that enables you to change your wallpaper.

Got a favorite picture? Make it the wallpaper for your new phone or tablet. / © EnTech
If none of the options are to your liking, you could try out a new icon pack or test some other backgrounds – there are lots of these on the net.
How do you like your new Android smartphone? Did setting up your phone run smoothly? Let us know in the comments.